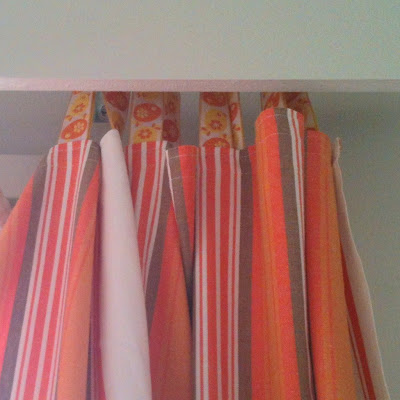
Yes, they were the ones for the kitchen window, and yes they did come up too short for it...
I guess if you really really like something, and if it's the exact look and quality you are after, and if the price is so right that it's almost wrong, a cunning plan might emerge spontaneously to budge the purchase along.
That's exactly what happened - we spotted a tablecloth in a similar weave and colourway, and a lightning-fast blueprint sketched itself out in my head about how I'm going to use the tablecloth to extend the curtain length.
Well, by the time we walked home another possible solution came to me.
I'd been collecting vintage braids and I remembered that one roll in the stash has the cutest orange chickens on it. I compared the two options - choppy tablecloth extension or quirky chicken braid - and the chickens won.
Here are the steps I took to bring about a happy fusion of the perfect yet imperfect curtains and the kooky chickens:
1.
My mission was to gain about 10cms of length yet retain as much of the original look as possible.
2.
My curtains had a lovely wide hem on top which meant extra length to be freed up, so out came the seam ripper.TIP: The thing to look for when buying a lengthening project candidate: is there a big fat turn-up or wide hem which can be unpicked and let out to gain some extra length?
3.
I preserved a centimetre of seam allowance so I could tidy up the top neatly. Then fired up my trusty iron and set about pressing that tough old crease out.TIP 1: Spray the old crease with much water and set the cloth aside folded - this way the fibres soak in the droplets, enlarge and relax so the ironing will be more effective.
TIP 2: The unpicked seam might leave the fabric marked, the crease that's been there for the last 40 years might be quite persistent. Relax - these should become less visible with every wash and iron.
4.
The next step was to measure the new length of the curtains.Accordingly, I calculated how much length was still needed. And here the chicken braid was entered. I needed an extra 5cms still to cover the windows comfortably; to this I added the width of the braid as seam allowance, then multiplied this sum by two. This was the length of braid I needed to cut for my loops.
Then I determined how many loops my curtain needed to be held up by - quite a few as I didn't want big gaping drapes at the top.
Following this, I measured the top width of my curtains and allowed for seam allowance each end, then cut two long lengths of the braid accordingly.
I pinned all the loops in place, pinned the backing braid length over them and clipped the curtains up on the window as if they were ready.
Important move in order to see if anything needs changing! I needed shorter loops because I could see a lot of top window frame... It saved me some frustrating unpicking.
5.
Adjustments done, next I machine stitched the top edge of the braid to the curtain top, loops held in place by pins.Then I turned my curtain to the right side and stitched down the bottom edge of the braid - I wanted to make sure I don't crinkle up the right side.
6.
And voila there I had my new old curtains - now perfect in length too.The top shows off a small amount of chicken action; the busy kooky braid is only supporting the curtains but not taking away from their glory - which is exactly what I was going for.
I haven't figured out how to take a good photo of daytime windows without the otherworldly glare, so please excuse the picture quality and the imploding fir tree...
As to what happens to the now excess 70's tablecloth?
There's a slight off-chance that it will become wall art - I'll keep you posted! <edit 04/07/2013: it has become a kitchen tea towel! see the DIY here >


.jpg)


I love it! The chickens are just waaay to cute!
ReplyDeleteThanks Caddi!
DeleteI thought the same - so pleased that I remembered that roll of braid :)
super cute...and those little chickies are awesome!
ReplyDeleteThanks Val :)
DeleteThanks Aniko, my sister Kikka forwarged me to your blog in order to dolve my problem about my Marimekko Unikko tablecloth to be curtain in my sauna restroom :) Sari
ReplyDeleteso solve:)
DeleteHei Sari,
DeleteThat's so nice of Kikka to recommend my blogpost to you! I hope you could use the idea to extend your Marimekko fabric for your sauna room! x