For the wadding I chose a 100g thickness - not too thick, not too thin. For the backing I thrifted an Ikea hippo fabric (child's duvet cover). It had a small stained area, and it was a little short for the quilt's size, so I cut it up to exclude the stains and extend the length with a strip at each end. Some of the hippos ended up with two butts and too many legs, but it still works.
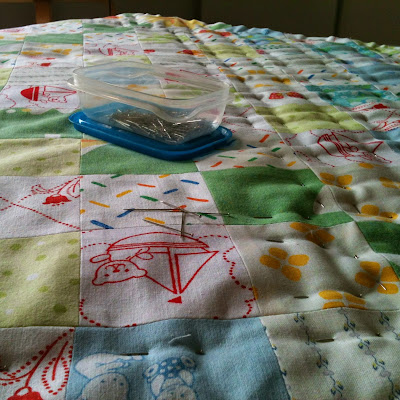
After giving some thought to how the quilting should be done, I got out my big box of pins and got pinning. If you can get specific pins with stoppers meant for quilting, I recommend you to do so - you won't end up with cat scratches all over your arms like I did.
Mind you, during my three years of fashion university I developed a detached immunity to pinpricks and a sixth sense for loose or dropping pins. It's highly advisable not to have any cups of teas or coffees knocking around at this pins-in sewing stage - pins can end up everywhere when you are busy, including your drink, your slippers or even your bra. I'm talking from experience!
I sewed with plain white cotton at the front, but for the bobbin I picked a thread in a very pale yellow hue. It blended better with both white and lime green bits.
I have one more post about the progress of my first-ever quilt, about attaching the binding - and then it's ready!


wow that looks great. i´m deeply impressed.
ReplyDeletebtw: i´m curios about your blog after birth ;)
go on!
jule*
thanks and nice to see you here!
Deleteoh, i'm very curious too! i hope it won't go all downhill :)
It is beautiful. I really like your fabric choise and that the pattern is centered. I really like the hippo fabric I have it myself in my stash in red.
ReplyDeleteReally good job, Mum.
Bye, Steph
i remember your red hippo fabric, you used in in the squishy cubes right? i've got a little bit left of this green, for a small cutter, let me know if you'd like to have it x
DeleteLooking forward to the binding post, this is what I need to learn! I usually sew front to front then turn over and sew all around and that's not quite the right way to do it!!
ReplyDeleteLove the look of your quilt, for a first time, I think it looks amazing, well done!!
binding is not too difficult - i just get confused when joining the corners - but i managed it :) will post about it soon! i quite like the idea of doing it your way, i'm thinking of making a little jersey receiving blanket, and I don't have the right kind of edging for it...might try to finish it the way you do it. thanks Helene! x
Deleteyou did a great job with the quilt project so far!
ReplyDeletewaiting to see it finished!
not far now - it's actually finished, i'm just taking my time with posting about the stages :) thanks Evdokia x
DeleteOh, that's beautiful! I love looking at your creativity posts!
ReplyDeleteIt indeed looks like a kaleidoscope quilt, and I love the hippo fabric! The two-butted hippos just make it extra special :)
thank you Caddi! i hope the little one will enjoy it too - there's plenty to look at... i'm wondering how the blanket's story will develop when he's born and when he starts using it. i wonder if the two-butt hippos will be noticed :) x
DeleteEz szuper jo! Ügyi vagy nagyon!
ReplyDeleteköszi!
DeleteHow cute! And do I need to remind you that hippos are supposed to be so super fat that they look like they might have two butts? ;-)
ReplyDeleteOh my, I LOVE it. Beautiful colours and lovely layout.. you are so clever :) xx
ReplyDelete